
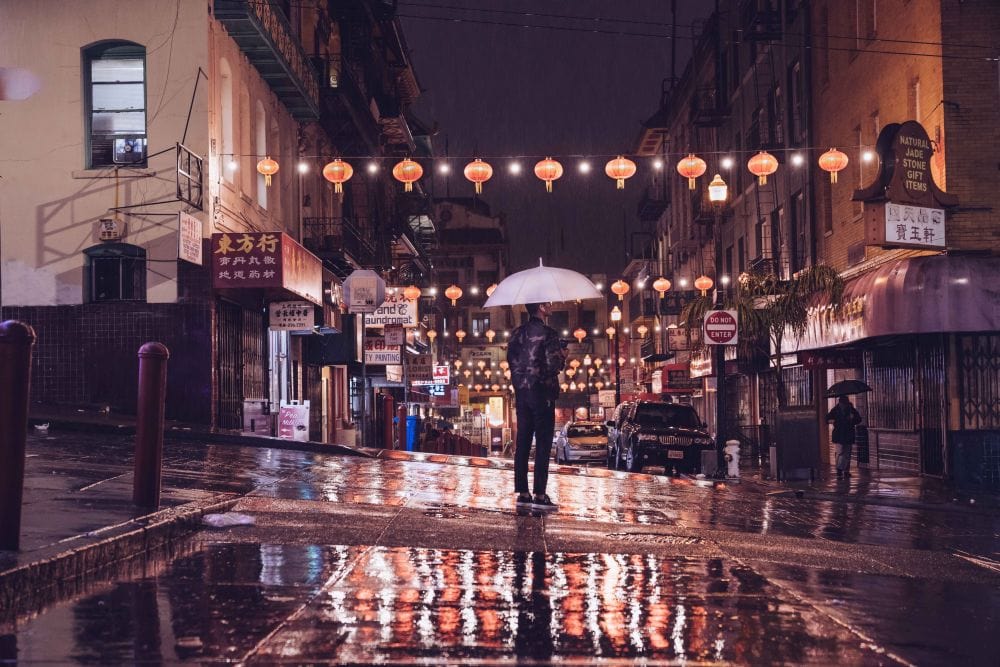
When photographing at night, you need to pay heightened attention to both the light and the movement of your subject. You may find that a tripod, a specialised lens, and a camera that can increase its ISO without sacrificing image quality are helpful accessories. There are many factors to take into account. However, there is a large amount of room for experimentation. There are times when placing appropriate limitations on your work allows you the freedom to find the most interesting images.
The following advice will help you get the most out of your nighttime photography sessions. Photographers who aren't afraid of the dark can catch some of the most dramatic moments of the day, when the city and its environs are at their most beautiful. At night, though, even the most skilled photographers have trouble capturing the scene in all its magnificent complexity.
Fix the Settings for Your Nighttime Photos
There is less light to work with while taking photos at night. In this way, whether you're taking pictures of the stars or the city lights, you'll need to make sure there's enough light on the subject for the camera to register it. Changing your camera's ISO, shutter speed, or aperture to their nighttime photography settings is a fantastic place to begin (the sensitivity of your digital camera, which is analogous to the film speed in a film camera). You could also try to find methods to alter the lighting conditions surrounding your subject. Whether you employ a flash, fill light, or simply have your subject step into the light from a nearby street lamp, you'll want to ensure that their features are well lit.
Each of these has a different set of constraints that can only be overcome with forethought or luck (for example, if you want that tree branch to move out of the way of your light, you will need a length of rope or a very consistent wind). Because you won't have as much control as you would during the day, it's important to give yourself plenty of time to experiment with different settings if you want to produce high-quality nighttime photographs.
Find Your Light.
A photographer and an art director agree that the greatest time to take photographs is at night since the lighting conditions are more consistent than they are during the day. Because of this, taking pictures at night is ideal. Because of this, you have a great deal of leeway for experimentation; you may keep trying new things until you find what works, without worrying about the light shifting. Going outside during the day will show you that the sun moves around. That way, you may keep experimenting until you find what works best without worrying about the light shifting. In spite of the fact that you'll have to use a wide aperture and moderate shutter speeds, the constant lighting will allow you to experiment freely.
Photographers suggest attempting a variety of lighting setups when taking pictures on the street at night. They recommend regularly making use of light to delineate the form and size of objects. Therefore, it is not a pretty sight if the light from a window or other source illuminates an entire wall or ceiling, leaving no discernible boundary between the building and the night sky.
It's recommended that you bring some sort of light source along in case you feel like trying your hand at light painting. It's possible to choose from a wide variety of solutions, the vast majority of which are lightweight and easy to move. A flash light should be used to illuminate the subject, and the shutter speed should be set to five seconds. If you all have cell phones, you could use them to coordinate your efforts and announce something like, "When I count to three, we're going to start painting this little area of the building." Digital cameras provide instantaneous previews of your shots. If at first you don't succeed, try, try again, because trying again is a lot of fun.
Keep It Sharp
Focusing on the subject of your photo when utilising a longer exposure and bigger aperture might be challenging. To prevent blur when using a wide aperture or slow shutter speed, you may need to steady your hands. If you do this, you won't experience any blur. Nighttime shooting is slightly less frantic than during the day. Many nighttime shots suffer from blurry subjects since the photographers were not using a flash. When they expand to a very shallow depth of field, there isn't much wiggle room for sharpness. Your subject will no longer be in the camera's focus range the moment they move merely a centimetre or two away from you.
Take your time setting up your photograph and ask your human subjects to be motionless for the best chance for a sharp photo. Taking pictures of the night sky, or astrophotography, can be challenging, but a landscape photographer can help. Very long exposure times and sharp focusing are essential for this kind of photography, as is the use of a cable to release the shutter from a distance. A tripod should also be readily available. Because, once again, you should limit motion.
When shooting star trails or in blustery conditions, others have advised making do with what's at hand to reduce camera shake. After setting up the tripod, you may keep it from blowing over by securing it with your backpack. The bag will serve a purpose not unlike that of a sandbag.
FAQs About Night Photography
Long exposure night photography is the best way to capture the magic that happens every day when the sun goes down. Landscape photography is my favourite genre, and night photography is undoubtedly one of the most exciting things to shoot.
Taking photos at nighttime might seem daunting. Shooting in the dark might even be scary for a lot of people, but trust me: once you try long exposure photography at nighttime, you'll discover a whole new world. With this long exposure night photography guide, you'll lose any fear of stepping over to the "dark side". You'll find inspiration from some night photography ideas, as well as all the answers that you are looking for.
The definition of long exposure night photography is taking photos at night time using a slow shutter speed. As we explained in our guide to long exposure photography, the shutter speed is the cornerstone of long exposure photography. When you're shooting at nighttime, long exposure photography helps you compensate for the lack of light by opening the camera shutter for a determined length of time and capturing scenes that your eyes can't see.
Taking long exposure photographs at night, you'll be able to capture starry skies, fireworks, car trails, or mesmerizing landscapes lit by the moonlight. Regardless of your goal, the basic principle is taking a long exposure in low-light conditions. I highly recommend reading our guide to take photos of the milky way and our Northern Lights photography guide if you want to dive deeper into those specific photography genres.
Long exposure photography at night is not as simple as it seems. Shooting in the middle of the night, surrounded by nothing but darkness, is not conducive to taking easy pictures. On top of that, dealing with your camera and settings is always challenging when you can't see.
But don't worry; having an idea of how long exposure night photography in advance makes everything easier. Below, I'm breaking down the ten basic steps to do long exposure night photography:
Plan Your Long Exposure Photography At Night In Advance
Walking around in the dark without knowing where to go is not the best scenario, so scout and plan your location and the images you want to take. The absolute key to long exposure photography at nighttime is planning, and in most situations, great planning pays off. Pack your bag carefully, and don't forget extra batteries, memory cards, warm clothes, and a headlamp!
Choose Your Long Exposure Night Sky Composition
Use your headlamp or a flashlight to find the elements you want in your composition. For example, if you want to take a long exposure to the stars, using an app like Photopills will help you find and predict the movement of the Milky Way.
Set Your Camera On A Tripod To Take Long Exposures At Night
Set up your tripod by making sure that it's stable in a safe place, and mount your camera onto your tripod. This is essential for avoiding any side effects, such as vibrations, if you want to take sharper images.
Adjust The Basic Long Exposure Night Photography Settings
Turn down the brightness of your LCD screen to avoid underexposing your images, make sure you are shooting in Raw and Manual mode, turn off the image stabilization of your lens, and attach the shutter release or turn on the delay mode in your camera.
Set Your Iso And Aperture
As we explain in-depth below, these settings will vary according to the conditions. Nevertheless, they play a key role in long exposure night photography.
Focus On Your Long Expo Night Shot
This is possibly the most challenging step while doing long exposure photography nighttime. Even though the technique will vary depending on your subject (focusing on photograph car trails is not the same as focusing on the milky way), nailing your focus is particularly important. Don't forget to turn off the Auto Focus after focusing.
Calculate The Shutter Speed
The shutter speed is the most important setting in long exposure photography at night, and it'll depend on the subject, light conditions, and your goals. Below we'll dive into the best shutter speed for nighttime long exposure photography according to the scene.
Take A Test Shot Of Your Night Sky Image
Use a shutter release or your camera's built-in delay mode to avoid shaking. Also, if you're shooting with a DSLR, I recommend turning on the mirror lockup to minimize the vibrations.
Check The Test Shot To Make Sure That The Settings Are Correct
Don't forget to check the focus, histogram, and composition once you have taken your first photo. If you're shooting the stars, zoom in to verify that they're sharp, especially in the corners.
Take Your Final Long Exposure Night Photo
Readjust your settings if necessary, shoot, and enjoy the magic of taking long exposures at night. These are the basic steps to do long exposure at nighttime, but you might need to change or skip some steps depending on your circumstances, gear, and conditions. Again, the best way to find your workflow is through practice and patience.
Keep in mind that there are huge differences between doing long exposure night street photography, like taking photos of light trails at nighttime and photos of the stars in a completely dark environment. Therefore, the basic settings (ISO, Aperture, and Shutter Speed) will change depending on the long exposure night photography that you're doing.
While the exact settings will change from picture to picture, the ideal settings for night photography are a high ISO (typically starting at 1600), an open aperture (such as f/2.8 or f/4) and the longest possible shutter speed as calculated with the 500 or 300 rule.
Most night photos fail because the shutter speed is much too slow when the photographer takes the shot. If it's any longer than about 1/50th of a second and you're shooting handheld, the image is going to be blurry; it's just not possible to keep your hands perfectly steady enough.
Night Photography for Beginners
If you're a photographer looking to broaden your horizons, night photography might be just what you're looking for. This type of photography can yield some stunning results, but it does necessitate a bit more skill than daytime shots. In this beginner's guide to night photography, we'll go over the fundamentals of getting started, from selecting the right equipment to framing your shot. Continue reading if you're ready to dive into the world of nocturnality!
Prep For Field
- Find out what the forecast is like.
- Check the rising and setting of the moon to determine when each new phase begins.
- Utilizing the Star Walk application
- Clean and disinfect your gear
- Before leaving, prepare your camera and its settings.
- Turn the brightness of your screen down to a minimum.
- Switch to RAW format in your camera.
Field Tips
- Put something heavy on top of your tripod to ensure its stability.
- Capture pictures of the path.
- Try to avoid using as many bright white bulbs as possible.
- Wait There may be other photographers about, and it may be difficult to spot them all. Please be aware of their work and try not to interfere with it.
Optimal Camera Presets
- Manual focus
- 2-second and 10-second timers
- 20 - 30 second shutter speed
- ISO 2000 - 3200
- Reduce the aperture or F/stop to 2.8 / 3.5.
- Make sure the "live view" mode is turned on.
Guidelines for Editing
- The majority of nighttime photography comes to life in post-production.
- Apps recommended are Lightroom and Photoshop
- Customise temperature, exposure, highlights, shadows, whites, and blacks.
Expert Tips
Combining many photographs in Photoshop is sometimes required to get the desired effect while shooting at night, especially when trying to include a subject or foreground. This is due to the following factors: There is too much light in the background, and the Milky Way is in the wrong place. Make sure to capture the Milky Way in the background of your shots, as well as in the foreground and subject, of your photographs.
If you want to take photos that look like paintings, consider light painting by lighting your subject with a torch or flash during the exposure. French artist Auguste Renoir invented light painting in the late 19th century.
Long Exposure Night Photography Tips
We've covered everything you need to know to get started with nighttime long exposure photography, but if you're want to take your skills to the next level, here are a few more tips for shooting the night sky.
Get yourself a solid tripod.
Without a solid tripod, you'll probably return home with fuzzy photos. In this location, you can test out several tripods for nighttime long-exposure photography.
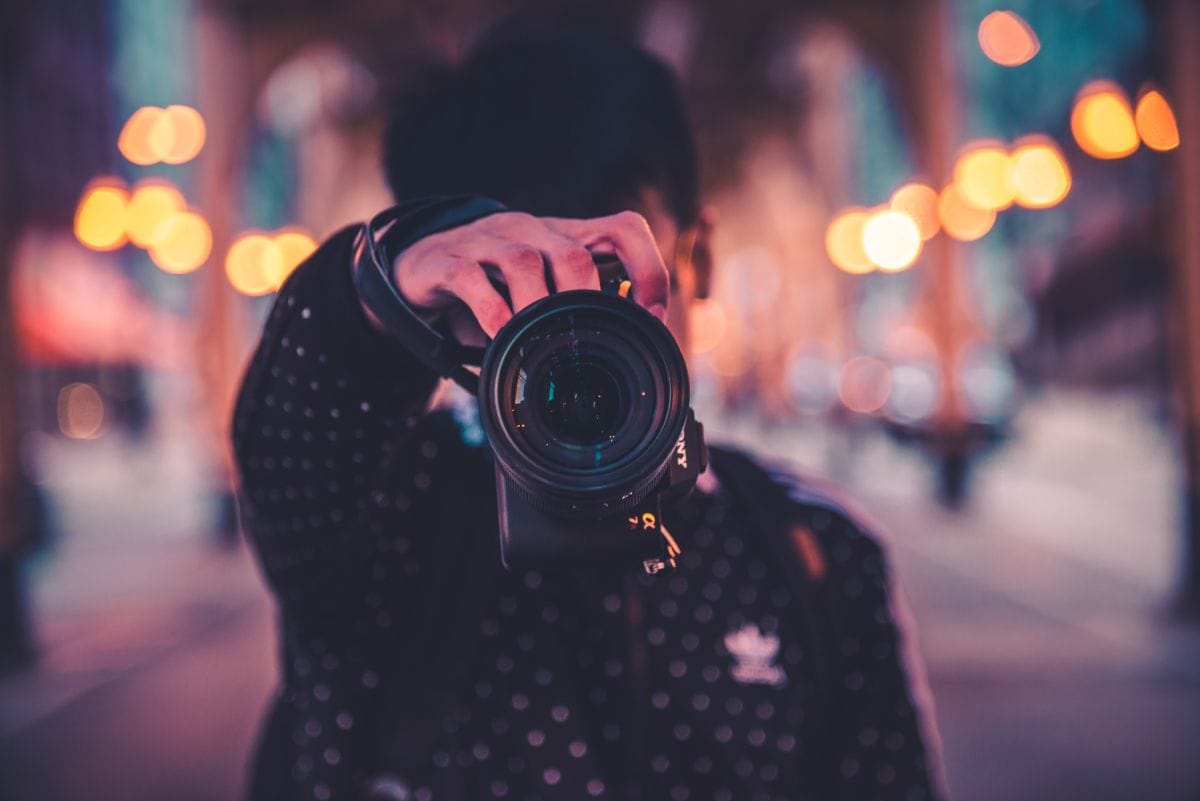
Take use of high-quality photographic equipment.
Having a more sophisticated camera does not make one a better photographer. In spite of this, night photography is one of the rare subgenres in which the quality of the equipment makes a noticeable difference, especially when shooting the Milky Way. In this article, we'll discuss the finest accessible cameras and lenses for night photography.
Include still elements in your composition.
When shooting at night with a long exposure to capture light movements, it's a good idea to include some static components in the composition, such buildings, rocks, or mountains.
Capture images in their raw form.
To obtain the best possible recording quality and a large enough data set for use in post-production.
The White Balance can be adjusted to your liking.
If you want uniformity in your nighttime long-exposure shots, especially those that will be stitched together into panoramas, you should set the white balance manually. To get started, try a temperature between 2850 and 3900 K.
A long exposure calculator should be used.
There are a number of handy apps that can be used to quickly and easily determine the shutter speed required for nighttime long exposure photography. Two sample images demonstrating the usage of long exposures are included in our comprehensive guide.
Make use of the night's moonlight
If you want to take beautiful photos of the Milky Way or the stars when conducting long exposure night photography, you should avoid shooting shots when the moon is shining too brightly. However, if you use a long exposure when the moon is out, you'll get some beautiful shots of the terrain.
Post-processing noise reduction
You shouldn't get rid of photographs just because they have a lot of noise in them. You may lessen the amount of noise in your long exposure night images by using any of the best noise reduction software packages during editing.
Bring along some warm clothing and a flashlight.
Even on the hottest days, the evenings can be very cool, and nothing is more annoying than having to bundle up while trying to snap shots. In the event that you need to focus on and draw attention to specific features of your surroundings, a headlamp is an absolute must.
Make use of a stopwatch
Time lapses and star trails are ideal subjects for long exposure night photography, and an intervalometer is a handy tool to have. It operates like a shutter release but also lets you change settings and pre-set the camera for certain images. Online, you may find a wide selection of models at reasonable prices.
Conclusion
Night photography requires more careful consideration of light and subject motion. Changing your camera's settings to those optimised for nighttime photography, such as the ISO, shutter speed, or aperture, is a great place to start. A great deal of leeway exists for exploration. An art director and a photographer both believe that taking pictures at night is the best time to do it. Your ability to freely experiment is ensured by the steady lighting.
Shutter speed should be set to five seconds and a flash should be used to illuminate the subject. These days, digital cameras even allow you to get a preview of your photos almost immediately after taking them. There are two things you need to keep in mind when taking photos at night: the light and the subject's motion. When shooting at night, things tend to be a little less hectic than during the day. While there are numerous considerations to make, there is also considerable potential for exploration.
When photographing at night, there is less available light. You'll want to make sure the camera can see the subject well. If you want to take professional-quality photos at night, give yourself plenty of time to play about with the settings. If you're interested in trying your hand at light painting, you should have a light source with you. The shutter speed should be set to five seconds, and a flash should be used to highlight the subject.
While shooting is still frenzied, it is less so at night. The results of a nighttime picture shoot can be just as impressive, but you'll need a little more experience than you would for a daylight photo shoot. Below you'll find some of the most fundamental principles of shooting the nighttime classics, from choosing the correct gear to composing your shots. One of the rare subgenres where the quality of the equipment makes a notable difference is nighttime photography. In this piece, I'll go through some of the best consumer-level options for nighttime photography equipment.
Long exposures should be done at a temperature between 2850 and 3900 K. If you take landscape photographs with a long exposure while the moon is up, the results will be stunning. Time lapses and star trails can be accurately dated by using a stopwatch and an intervalometer. Reduce the quantity of background noise in your long exposure photos with the help of dedicated software.
Content Summary
- When photographing at night, you need to pay heightened attention to both the light and the movement of your subject.
- The following advice will help you get the most out of your nighttime photography sessions.
- There is less light to work with while taking photos at night.
- A photographer and an art director agree that the greatest time to take photographs is at night since the lighting conditions are more consistent than they are during the day.
- Because of this, taking pictures at night is ideal.
- Photographers suggest attempting a variety of lighting setups when taking pictures on the street at night.
- To prevent blur when using a wide aperture or slow shutter speed, you may need to steady your hands.
- Take your time setting up your photograph and ask your human subjects to be motionless for the best chance for a sharp photo.
- When photographing at night, you need to pay heightened attention to both the light and the movement of your subject.
- The following advice will help you get the most out of your nighttime photography sessions.
- There is less light to work with while taking photos at night.
- In this way, whether you're taking pictures of the stars or the city lights, you'll need to make sure there's enough light on the subject for the camera to register it.
- You could also try to find methods to alter the lighting conditions surrounding your subject.
- Because of this, taking pictures at night is ideal.
- Photographers suggest attempting a variety of lighting setups when taking pictures on the street at night.
- It's recommended that you bring some sort of light source along in case you feel like trying your hand at light painting.
- A flash light should be used to illuminate the subject, and the shutter speed should be set to five seconds.
- Take your time setting up your photograph and ask your human subjects to be motionless for the best chance for a sharp photo.
- After setting up the tripod, you may keep it from blowing over by securing it with your backpack.
- If you're a photographer looking to broaden your horizons, night photography might be just what you're looking for.
- In this beginner's guide to night photography, we'll go over the fundamentals of getting started, from selecting the right equipment to framing your shot.
- Capture pictures of the path.
- Make sure to capture the Milky Way in the background of your shots, as well as in the foreground and subject of your photographs.
- Without a solid tripod, you'll probably return home with fuzzy photos.
- Take use of high-quality photographic equipment. Include still elements in your composition.
- Two sample images demonstrating the usage of long exposures are included in our comprehensive guide.
- Use moonlight. When taking long exposure night images of the Milky Way or stars, avoid shooting when the moon is too bright.
- However, if you use a long exposure when the moon is out, you'll get some beautiful shots of the terrain.
- You may lessen the amount of noise in your long exposure night images by using any of the best noise reduction software packages during editing.
- Time lapses and star trails are ideal subjects for long exposure night photography, and an intervalometer is a handy tool to have.